Enrich your data and save admin time by automatically adding triggers and actions when fans complete certain activities. Or, take fan engagement to the next level with an automated email or SMS message triggered by certain actions or events, such as purchasing, subscribing, or birthdays.
How to create an automation
- At the bottom left-hand side, click the initials icon
- Select Automation

- Click New Automation

View types of automations
- You can also view Active automations, Paused automations, and Inactive automations by clicking on the drop-down menu under All Automations
 How to start, pause, stop, or delete an automation
- In the top right-hand corner, click the Settings icon
- From there, you can select the option to either start, pause, stop or delete the automation

Difference between Stopping vs. Pausing an automation
- Stop: When you stop an automation and the contact makes an action (like clicks on a link, signs up, or buys a ticket) they are not saved and will not be included in the automation when you restart the automation
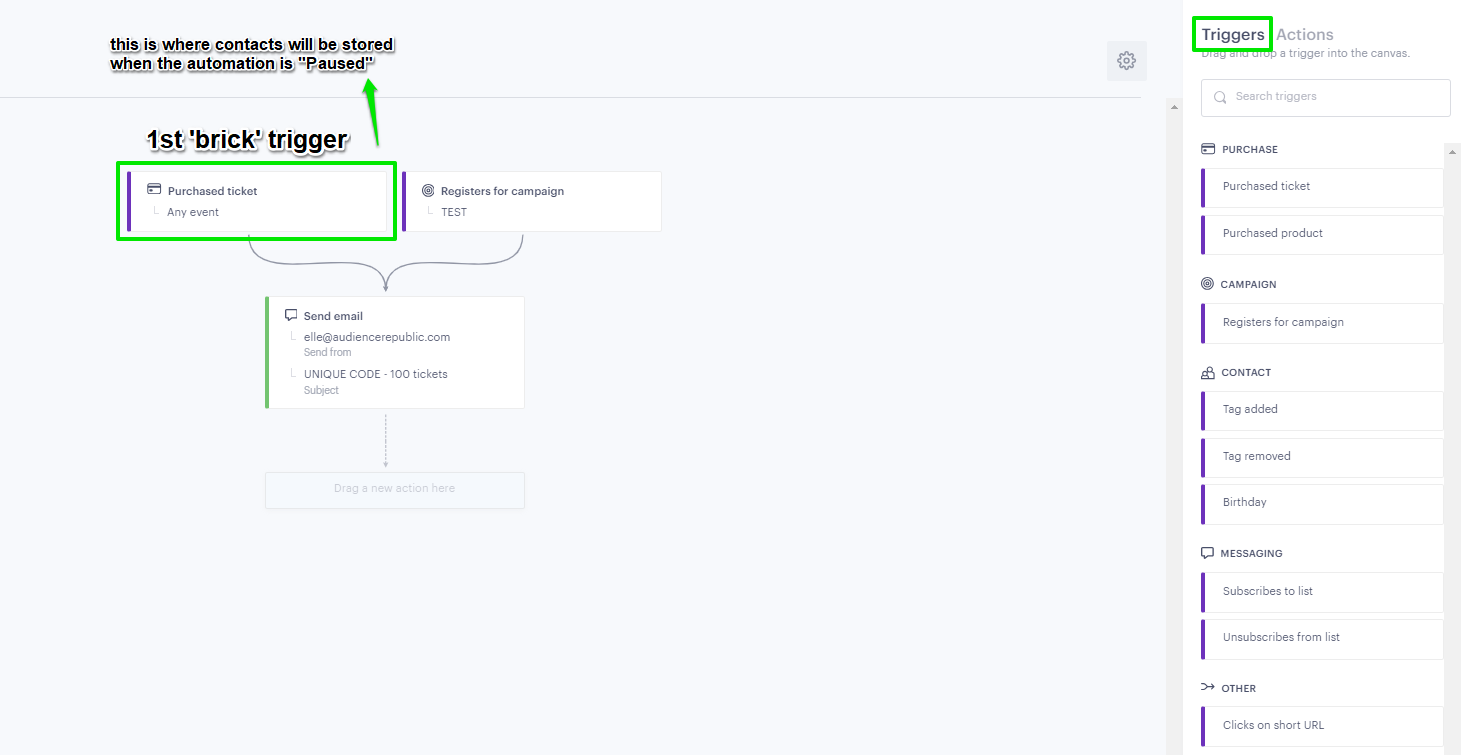
- Pause: If you pause an automation and the trigger is fired by a contact (for example: a contact buys a ticket, clicks on a link, or registers to a signup form) they are stored in the first trigger, known as the 'top brick', so when you restart the automation they will be pushed through the other triggers and the actions will occur for that contact.

Trigger definitions

Action definitions

How to duplicate an Automation
Create similar Automations without having to set up everything from scratch
- Go to the Automations page
- Next to the Automation that you want to duplicate, click ⋮ and select Duplicate
- Once updated, you will need to start the automation

- Clone Automation: Duplicate an existing automation by selecting it and clicking on the "Duplicate" option. This will create a new automation with the same settings as the original one.
- Automation Duplication: The new automation will have all the same triggers, actions, and conditions as the original one and will be named "[Original Automation Name] (copy)".
- Stopped State Default: To prevent accidental triggering, the new automation will start in a 'stopped' state by default. This allows users to review or make any necessary changes before activating the automation.
Example 1: Genre tag campaign registrants & auto-send SMS
If a fan registers for a campaign, a tag will automatically be added to that fan (such as genres "likes Rock" or "Likes Indie"), and an SMS message will be sent to the fan:
- Click and drag Registers for campaign
- Select the campaign name
- Click save
- Under Action, click and drag the Tag
- Select the tag
- Click save
- Click and drag Send SMS
- Enter your SMS message

- Preview the SMS message
- Tick 'I agree to charge my credit card'
- Click Save

Example 2: Send an auto-message to Fans before their birthday
Send a special offer SMS/email (like a discount code) to a fan before their birthday so they can redeem the offer as a birthday gift:
- Click and drag Birthday as the Trigger
- Next to Triggers, click on Actions
- Select Delay By
- Click and drag Delay by under Birthday
- Add the time
- Click and drag Send email, add the email sender address and email name
- Click Preview
- Click save

Example 3: Auto-send a message to subscribers
If your signup form links to a list: Anyone who subscribes to the list, a welcome email will be sent to say thanks for subscribing:
- Click and drag Subscribes to List as the Trigger
- Next to Triggers, click on Actions
- Click and drag Send email, add the email sender address and email name
- Click Preview
- Click save

Example 4: Add genre tag(s) to subscribers
If a fan subscribes to a list, a genre tag will be automatically added, however, if the fan doesn't subscribe, then they won't be added to the list:
- Click and drag Subscribes to List as the Trigger
- Next to Triggers, click on Actions
- Click and drag If/Else
- Select 'Tag assigned to or'
- Click and drag Add to List
- Select the List
- Click save

Example 5: Purchases to any event, add a tag and send an automated email
If a fan purchases tickets to any event, a specific tag will be automatically added, and an automated email will be sent:
- Click and drag Purchased ticket (any event) as the Trigger
- Next to Triggers, click on Actions
- Click and drag Add a Tag
- Click and drag Send email
- Select the List
- Create the email
- Click save

New Triggers
Birthday
Select a timeframe of up to 30 days (before or after)
- Example:

Event date
Choose a time frame to trigger the automation that is either before or after the Event date:
- 1 - 6 days
- 1 week
- 2 weeks
- 1 month
Example:

How to trigger an automation based on Web Activity - coming soon!
- Go to Automations.
- Drag and drop the "Verified Website" trigger brick
- Enter the number of times a fan has visited the website

- Add Action bricks to complete the set up of your Automation
- Start the Automation
- The automation will then trigger based on the specified number of website visits by the fans
Insights - Coming soon!
- In the Automation Insights tab, you will be able to view, pause and edit an Automation
- Check the number of sent messages, open rate, click rate, and click-to-open rate.

Still need help?
Contact us at support@audiencerepublic.com
Was this article helpful?
That’s Great!
Thank you for your feedback
Sorry! We couldn't be helpful
Thank you for your feedback
Feedback sent
We appreciate your effort and will try to fix the article
